The Akai MPC 500 is a unique MPC because it has a very basic two line display. But once you get used to this display, the Akai MPC 500 is actually quite easy to use. In this beginner’s tutorial, I’m going to run through the basic concepts of loading files and folders into an Akai MPC 500. This tutorial is adapted from my Akai MPC 500 tutorial book, ‘Beat Making on the MPC 500‘.
Akai MPC 500 File Format Overview
Transfer the TEST folder from the tutorial files onto your MPC500 memory card (compact flash, or CF card).
Go to the main LOAD screen (MODE and pad 2). You will see the following:

To view the contents of TEST, press the right arrow cursor (as indicated by the ‘>’ on your screen, on the second line). Unlike other MPCs which are capable of letting you see many files at once, your MPC500 only has a two line screen so can only show one file or folder at a time. So first you have to choose what type of file you wish to view. Using the grey cursor keys, move your screen cursor to the right from ‘Load:’ and scroll your data wheel to see all the various file types available:
Sample: This represents an individual audio sample file (.WAV or .SND). Your MPC can read the standard computer audio file, a WAV file, as well as the old MPC3000/MPC2000 SND file format.
Sequence: This is an individual sequence file (.MID or SEQ). When you record a sequence in your MPC sequencer, you save all the note data into this sequence file. As we shall see later there are two options when saving individual sequence data, one is to save a .MID file which is actually a standard MIDI file as used by all MIDI equipment (contains no MPC specific sequence data), and the other option is to create a SEQ file which is similar but does contain sequence information that can only be read by an MPC500, MPC2500 or MPC1000. Reloading either of these files will recreate this sequence information in your MPC. Please note that no sounds are saved with this file, just sequencer event information.
Program: This is a program file (.PGM). A program is a collection of sounds assigned to particular pads, so loading this file will load all the samples in that program as well as their pad assignments and their particular parameter settings.
All sq&song: An .ALL file contains all the information about sequences and songs in memory at the time of saving. Unlike the MID file which only loads a single sequence, an ALL file will save all sequences currently stored in memory (up to 99), plus any songs you have create with them (a song is simply a set of sequences played in a particular preset order, we’ll discuss this in later tutorials).
Project: This is a project file (.PRJ). A project file is a single file that when loaded will load all sequences, songs, samples, programs and effect settings associated with that project – basically each beat you make will be saved as a project file, so it can be perfectly re-loaded into memory just by loading this single file.
Folder: This allows you to load all files from a particular folder directly into memory.
As you move your data wheel (from far left to right), you will see the various files in your TEST folder. With ‘Load: Program’ selected, you will see ‘Fil:DRUMS’ on the second line of your screen. This means you have a program file called ‘DRUMS’.
Now with ‘Load:Sample’ selected, you should first see ‘Fil:HAT’ indicating a WAV file called ‘HAT’. Now cursor down so that HAT is selected and data wheel to the right. As you do, you will see a succession of sample names: ‘HAT’, ‘KICK’, ‘SNARE’. Hence there are 3 unique samples in this folder.
Now cursor back up to ‘Load:’ and jog wheel to ‘Load:Sequence’ – we have a sequence called ‘Beat’ shown on the second line. Next go to ‘Load:All sq&song’ and on the bottom line you’ll see an ALL file called ‘ALL_SE..GS’ – when you see ‘..’, this means we have a long file name that has been shortened to fit onto the screen (the full name is ‘ALL_SEQS&SONGS’). Next up is ‘Load:Project’ and you’ll see the ‘TEST-P’ project file. Finally, under ‘Load:Folder’ you’ll see nothing, indicating that there are no sub folders within the TEST Folder.
Now we know what files can be loaded, let’s look at how we can actually load them.
Loading Samples
Samples can be loaded individually, one by one, but rather than do that let’s just load up an entire program of samples called DRUMS – I made this program previously and have already assigned all our WAV samples to some pads. So, select ‘LOAD:Program’ and press DO IT. DO IT is located under the cursor keys and should be flashing red.

You’ll see the following:

The top line tells us that the program will be loaded with all attached samples, which is what we want. You can highlight ‘With sample’ and change this to ‘Prog only’ using the data wheel and this will just load the program without samples, but at this point we don’t really need to worry about that. Leave ‘Clear memory’ set at ‘NO’ and press DO IT again. You’ll see the following:

If set to YES, should you have any sample in memory with the same name as one being loaded, this existing sample would be overridden. Set to NO, then the new sample would not be loaded. In our example, there are no sounds in memory, so it is irrelevant. Press DO IT and your program loads. Want to hear the program and sounds? Press MODE and pad 6 (PROGRAM) and hit any of the pads on the bottom row of pads – you should hear your kick, snare and hat.
Loading Sequences
Now let’s load up our BEAT sequence. This is an individual sequence file that will contain a simple beat based on the samples loaded via our DRUMS program. In the LOAD screen, highlight ‘Load:Program’ and data wheel to ‘Load:Sequence‘ – you’ll see ‘Fil:BEAT’ on the second line. Hit DO IT. This time, you will see a different screen:

Here you can select which of the 99 sequence holders you want to assign your new sequence. It makes sense to load it into sequence holder 1 – basically, your MPC will always default to the nearest empty sequence holder, but you can override this and even overwrite an existing sequence if required just by using the data wheel to select it (but as our memory is blank, this doesn’t matter). Press DO IT.
With our drum program and beat sequence in memory, let’s have a listen to our beat. Press SEQUENCE button (the grey button underneath MODE) to bring up the main sequencer screen and then press the PLAY START transport button – you’ll hear our 2 bar beat loop continuously.
Loading Projects
Now, let’s see how project files work. A project file is an easy way to load up a snapshot of your MPC memory – we’ll see how to create one of these in the next chapter, but first let’s load up one I made earlier.
Go to ‘Load:Project’ and make sure oyu have ‘File:TEST-P’ selected on the bottom line – now press DO IT. You’ll see the following:
‘Pressing DO IT will clear entire memory’
That’s okay, we want to do this, so press DO IT again. Now go back to the SEQUENCE screen and press PLAY START – your beat will play. So rather than laboriously load programs and sequence files as we did on older MPC’s, we can now load up an entire project in one single load. Very nice.
Folder Loading
We’re now going to load the entire ‘TEST’ folder manually. In the LOAD screen, select ‘Load:Folder’ and you should see the following:

As indicated by the ‘<’ arrow, pressing your left grey cursor will take you out of the TEST folder and back into the root of the CF card. So simply go down to the bottom line, press the left cursor once and you should see the following:

DO IT is now flashing and is indicating that you are now able to load the entire TEST folder into memory. Press DO IT and the screen will show the following:

This screen tells you that your MPC is about to load all the programs, samples and sequence/song data contained within that folder. The ‘Clear memory’ option dictates whether the MPC will load the folder contents and at the same time will also wipe any existing files in memory. This option is good if you want to start with a clean slate if you existing memory contents were not needed any more. To clear memory when loading, simply cursor to NO and jog wheel until it says YES.
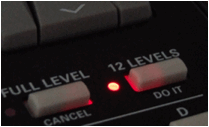
So, to load your entire folder, you can press the red flashing DO IT – if you wish to cancel, you’ll see that the CANCEL button (FULL LEVEL) is flashing next to your DO IT button, so pressing this will not load the folder and just return you to the main LOAD screen. After loading, you will be returned to the main loading screen. The contents of the TEST folder are now loaded into memory and you can go to SEQUENCE and press PLAY START to here our drum sequence again.
Note that you can load an entire folder even if say, ‘Load:Sample’ was selected – just ensure that underneath, you navigate left or right until the folder name you wish to load is present – hit DO IT and it will load all files in that folder.
Loading Individual Sounds
So, let’s look at how we can load individual sounds from the memory card. So, make sure you are on the LOAD screen (MODE & PAD2) and dive into the TEST folder like you did previously. Select ‘Load:Sample’ and you should see something like this:

Cursor down to the second line and scroll to the right with your data wheel and you’ll see our three samples listed – HAT, KICK, SNARE. Want to preview these samples? If you look at the bottom right of your MPC500 you’ll notice the PLAY transport button is now flashing green. Hit this and the currently selected sample in the LOAD screen will play – pretty cool.
To load HAT, simply select it as per the screen shot above and press DO IT. You’ll see the following:

The above is asking you which pad you wish to assign this sample to. By default, the ‘OF’ means that it will not be assigned to any pad, instead it will just sit in memory. We’ll look at pads and programs in a later chapter, so for the moment, leave this set to OF – this will assign the sample into memory, and will allow you to assign it to a pad in a program later.
Press DO IT and you’ll probably get a warning:

You are seeing this because you have already loaded this sample into memory previously when you loaded the TEST folder or the project file etc. If you press DO IT now, this HAT will override the existing HAT in memory. Alternatively, if you data wheel to the right, ‘Replace’ becomes ‘Rename’ and you can give this sample a new name so both samples can co-exist in memory together. We’ll look at how to name samples later in the book, so for the moment, let’s just ‘Replace’ – so press DO IT. You are then returned to the LOAD screen and our sample has now overridden the existing HAT sample in memory.
Loading From Internal Memory
To load sounds from the internal memory, simply take out your CF card and go to LOAD. Now the only files displayed will be those from the internal memory.


Oct 27, 2012 2:17 am
how can you get the akai 128mb mpc sound library again?how can you get up and running on your brand new akai mpc500 after it been erased
Oct 29, 2012 7:24 am
Hi, you can download some of factory sounds from the Akai web site – there’s a link on the MPC1000 page:
http://www.akaipro.com/mpc1000/?tt=5
Once downloaded, just transfer to your MPC500 via USB
Feb 13, 2013 4:44 am
I am a new mpc 2500 owner, and I can’t seem to figure out how to load pads with sounds from my cf card , I can get to the load screen , hit do it and I have no idea where these sounds go, it looks like they load somewhere , and I don’t know where to find them and I really don’t see an assign to pad option. Any help , would be greatly appreciated.
Also , I will be purchasing the 2500 tutorial from you soon .
Thanks in advance
Also , is it dumb for me to learn this os(akai) or is it to my benefit as a new user to ditch this os and get the jjxl os , so I don’t have to relearn a whole different way to work?
Mar 1, 2013 12:52 pm
From what I remember of MPC2500 Akai OS, you should get the option to assign to a pad each time you load a sample. If that option’s not there, are you sure you are not using JJOS – this has a setting to just load directly into memory (press WINDOW in the LOAD screen to set this).
Either way, if correctly loaded the samples should be in memory, so can be accessed via TRIM (for editing) or PROGRAM (by assigning them to a pad)
Nov 1, 2013 3:53 pm
I have the same problem with my MPC500 – loading my sounds and they go into nirvana! I am a beginner too and I find this thing is MIGHTY old-school (DOS-System like) and I don’t feel going into it further, it’s not a fun tool it’s just frustrating how hard it is to get your samples where you want them BEFORE even starting! Performing is nice but everything else is not rewarding!
Nov 10, 2013 9:49 am
have a mpc 1000
bought it used
has jjjos 3.13 on it
cant save into a folder
only if i do it from usb
also only way i can save stuff
is if i give every samole a specific name and save to a sepcifically named project
lost alot of sequence dats
Nov 12, 2013 7:28 am
Hey, I’ve loaded the program, now all I want to do is play it and be able to recall it again easily at shows. How do I do this?
Thanks!
Jan 14, 2014 6:46 pm
how can i assign the samples to each pad?!
Jun 16, 2015 2:28 pm
I bought a used mpc 500, the previous owner has some programs loaded. When I try to load cf card contents the screen offers to erase cf card content. Help!!! Got a full cf card with Akai mpc sounds from the 2500 to the 4000. Can you help me solve this?
Mar 24, 2016 7:43 pm
i recently got an MPC500. Ive been having trouble loading any sounds onto it. I downloaded the test folder and followed the directions outlined above – attempted to load it multiple ways (program, sample, etc) every time it tells me “unknown file format”. This happens with every sample i attempt to load onto a pad, even when i record sound directly into the MPC. is this a defective unit? Any suggestions on how i may correct this issue?
Nov 19, 2017 11:43 am
I had the same problem but found out what to do about it. So just make sure your samples are 16bit.
Jul 11, 2016 10:31 pm
wat do i need to make sound come out my mpc 500 how do u set it up wat do u need?
Jul 31, 2018 10:06 am
Hey,
thanks for the great tutorial. It really helped me navigate the machine. I am loading sounds and it’s all working, but has disappeared when I switch it on again. How do I save what I did?
Thanks for the help!
Jul 31, 2018 10:12 am
Take a look at the SAVE screen, mode & pad 3. There you can save individual programs, sequences or typically the entire memory (project).
Check out my MPC500 tutorial book, it will teach you the entire machine in no time: https://www.mpc-samples.com/product.php/104/beat-making-on-the-mpc500/
Jan 25, 2024 6:20 pm
Oi pessoal estou precisando do sistema operacional do mpc 500